Wednesday, March 30, 2016

Paneer Macroni/Pasta in Indian Style

An Indian flavour to the Italian based pasta. As I live in a place where I dont get much of any ingredients to make a variety of international dishes, I thought why not give the Indian touch and I was glad I thought so. Try this simple pasta dish and its super yummy!.

Ingredients
  • Macaroni - 1 and 1/2 cups
  • Water - 3 and 1/2 cups to cook macaroni
  • Salt - 1/4 teaspoon while cooking macroni+as needed
  • Oil - 2 teaspoon
  • Butter - 2 teaspoons
  • Paneer - 200 gms
  • Ginger garlic paste - 1 1/2 teaspoon
  • Onions cubed - 1
  • Tomatoes chopped - 2 small
  • Slit green chillies - 3
  • Chilli powder - 1 1/2 teaspoon
  • Curry powder - 1/2 teaspoon
  • Garam masala - 1/4 teaspoon
  • Tomato ketchup - 1 teaspoon
  • Cheese grated(optional) - 2 teaspoons
Preparation
  1. To cook macaroni, boil water in a deep vessel. Once it starts boiling, add the macaroni, 1/4 tsp salt and few drops of oil. Let it boil for 5 to 6 minutes. The pasta should be soft yet firm. Take a bite and if cooked proceed.
  2. Strain the pasta in a filter and rinse it with running cold water. This is to make sure pasta stays non sticky. Set aside.
  3. Heat a wide kadai, add oil and butter. Add the cubed onions and saute till transparent. Add the green chillies and saute.
  4. Add the ginger garlic paste and saute. Add few drops of water and simmer till raw smell leaves.
  5. Add chopped tomatoes and mix well. Cook till the raw smell leaves.
  6. Add the chiili powder, garam masala, curry powder and little water and mix well. Stir for a minute.
  7. Add in the grated paneer. Add 1tbsp of hot water and stir fry till paneer cooked.
  8. Add in the cooked pasta/macaroni and mix well for the masalas to combine. Add salt and mix. Simmer for two minutes. Add grated cheese and switch off.

IMG_20160125_220457

Notes:

Make sure the pasta is cooked well before proceeding. Oil is added while boiling to prevent stickiness.

Monday, March 28, 2016


Mulligatawny Soup

This is my favourite soup and its Srilankans national soup too. I first tasted this soup in Anjappar Restaraunt and loved it. Now this is the soup I order every time. Saw the recipe from Samayal Samayal cookshow by Chef Venkatesh Bhat.

rakthi--v145262474756954b6ba008e

Ingredients:
  • Masoor dal - 100g
  • Oil - 2 tablespoon
  • Big onion - 2 sliced
  • Dessicated coconut -100g
  • 1 green apple - sliced(seeds removed)
  • Jeera - 20g
  • Jeera powder - 15g
  • Whole black peppercorns - 20g
  • Garlic - 10 cloves
  • Turmeric powder -1/2 teaspoon
  • Chilli powder - 1 teaspoon
  • Sugar - around 15g
  • Salt - as needed
  • Coriander stems chopped - 1fistful
  • Curry leaves - 1 fistful
  • Green chillies - 2 sliced
  • Milk - 100ml
  • Curry powder - 1tsp
  • Lime juice - from 1 lemon
  • Cooked rice – for garnish
Preparation:
  1. Cook masoor dal in pressure cooker with about 1 ltr water till it reaches a mashy consistency (5 to 6 whistles). Set aside.
  2. Heat a deep, heavy pan. Add 2tbsp of oil and add the sliced onions and fry till golden brown. Add the dessicated coconut and fry for a minute.
  3. Add the sliced green apple and fry for two minutes. Add the jeera and whole pepper and saute well. Add the garlic cloves and saute well.
  4. Add the cooked dal along with the water and mix. Add the turmeric powder, chilli powder,salt and mix well.
  5. Add the jeera powder, sugar and add a little more than 1/2 ltr water and cover and cook for 15 minutes.
  6. Add the fresh curry leaves and cut coriander stems. Add the sliced green chillies.
  7. Add milk mix well. Add the curry powder and mix well. Let the soup boil for a minute. Add cooked rice for garnish(about 1 fistful). Add the lemon juice just before serving. Serve hot!

Notes:

Do not skip the green apple, It gives a beautiful flavour. In case you want to strain the soup, do not waste the pulp, grind it to a chutney and use it because it is full of nutrients. However strain it before adding milk.The soup I had in the restaurant was not strained, but in the cookshow the chef strained the soup. I prefer it as such. You can even add cream in addition to the milk to make it more rich.

Friday, March 25, 2016

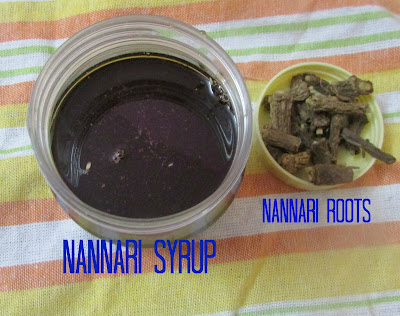
Nannari(sarasaparilla) Sarbath using Homemade Nannari Syrup

People from Tamilnadu will very well know this sarbath (chilled drink). This is one of my favourite natural coolers during the summer season. The nannari root has a magical cooling property. These roots are available in naatu marunthu kadai(country drug store).Try this at home and I am sure you will love it. Homemade is best as it contains no preservatives. Recipe inspired from SharmisPassions blog.


Ingredients:
  • For the nannari syrup:
  • Nannari roots - 50gm (1/2 cup)
  • Sugar - 250 gm(1cup)
  • Water - 2 1/2 cups
  • Lemon juice - 2 teaspoon
  • For the sarbath:
  • Nannari syrup - 2-3 tablespoon
  • Chilled water - 1 glass
  • Ice cubes - as needed
  • Lemon juice - from quarter of a lemon(or more as per liking)
  • Method:
    1. First, for the nannari syrup, clean the nannari roots well with water 2 or 3 times to get rid of the sand.
    2. Dry it in a newspaper for about 15 minutes till there is no moisture.
    3. With a help of a pestle, crush the roots so that it loosens up. Break open the root and discard the white part which is inside. Collect the brown part alone for all the roots.
    4. Put this in a mixer and pulse it one or two times to break it further. Do not grind.
    5. Boil the water till bubbles start appearing. Switch off and add the roots and close it with a lid. Let it stay overnight like that.
    6. After that, double fold a muslin cloth and strain the soaked syrup. Add the sugar and mix well till dissolved.
    7. Now heat the syrup till a single string consistency is achieved. It may take up to 20 mins.
    8. Once done, switch off (syrup will be like honey consistency) and let it cool completely. Now add the 2 tsp lemon juice. Store in a clean container in the fridge.
    9. For the sarbath, in a glass, take 2 or 3 tablespoon of the syrup, add the chilled water, ice cubes and mix well. Add the lemon juice and mix and serve!. Heaven I must say!!

  • Notes:
  • This does not contain preservative, so better to store in fridge. Store bought syrups are usually bright yellow. You can add food coloring while the syrup boils if you want too. But I preferred the natural way. I can surely say homemade nannari sarbath tastes way more good than the store bought!.